Pages

Sunday 24 February 2013

...............................................ode to TIKI BROPHY : www.tikisquiltroom.tumblr.com

Hello again! I hope you are all well?

I'm sure that by now some of you have given up trying to guess whose hands those belong to in one of my earlier posts and maybe some have already guessed correctly - long ago??? ...Huh??....
Some more clues....

Well, here she is.......Tiki Brophy!! A hard working, kind hearted, charitable, spirited, creative person, with a sense of humour and one who changes people's lives - FOREVER!!! Arthur (her hubby) refers to their home as a "Church'. I tend to agree with him because lots of prayers leave her quilt room on a daily basis with the quilts she creates for others and those she sells. So, one way or another, you leave her quilt room inspired and blessed, sensing that life is wonderful.

Here you can see Tiki hard at work on her Always believe in Angels among us Quilt.

Peaceful.......what more does a quilter need?  ......... a cup of tea, lots of fabric, creativity, a country breeze and Lord Oggington to watch over you.....
                                                                                     

Voila!! the 'Always believe in Angel s among us' quilt complete!


Once again Tiki hard at work teaching.


 A calm and relaxing atmosphere on her back verandah adorned with her bunting and beautiful hand stitched quilts. One has a sense of 'completeness' whilst sitting out there feeling the cool country breeze drifting in from her tiny garden forest.


This post is dedicated to a very special person and dear friend - Tiki - to thank you for changing and enriching my life, for introducing me to quilting and enhancing the quality of my life. I left the high blood pressure medication and don't need to drink Prozac!!!  lol!! Quilting fixed it all!!          
                            God bless you!


Friday 22 February 2013


                      BABY QUILT.....


At last I've finished baby Luron's quilt!  Mommy Antonique was so thrilled and proudly stands here showing it off!  The pattern I used is a quilt designed and made by Anni Downs called "My Favorite Things Quilt".                  

                                                  Antonique's helper - Evelyne was just as thrilled and grabbed the quilt and wrapped Luron in it immediately! Talk about 'quilted love'!! It took about 5 months to make the quilt. Credit to my mom Florence for her help and input with some of the hand stitching.

Wednesday 20 February 2013

THOUGHT FOR THE DAY  +   QUILTED BAG TUTORIAL  .....................................................

(Taken off Pinterest)


Helloooooo everybody!!!  How's life been treating you since we last met on my blog? 
Suddenly the early morning temperatures here in S.A. have dropped and one feels them in the evenings as well! I enjoy this this time of year as the leaves start changing colour (and dropping) and thats a photographer's dream - if you like the outdoors? I just love it!!


TUTORIAL - QUILTED BAG :

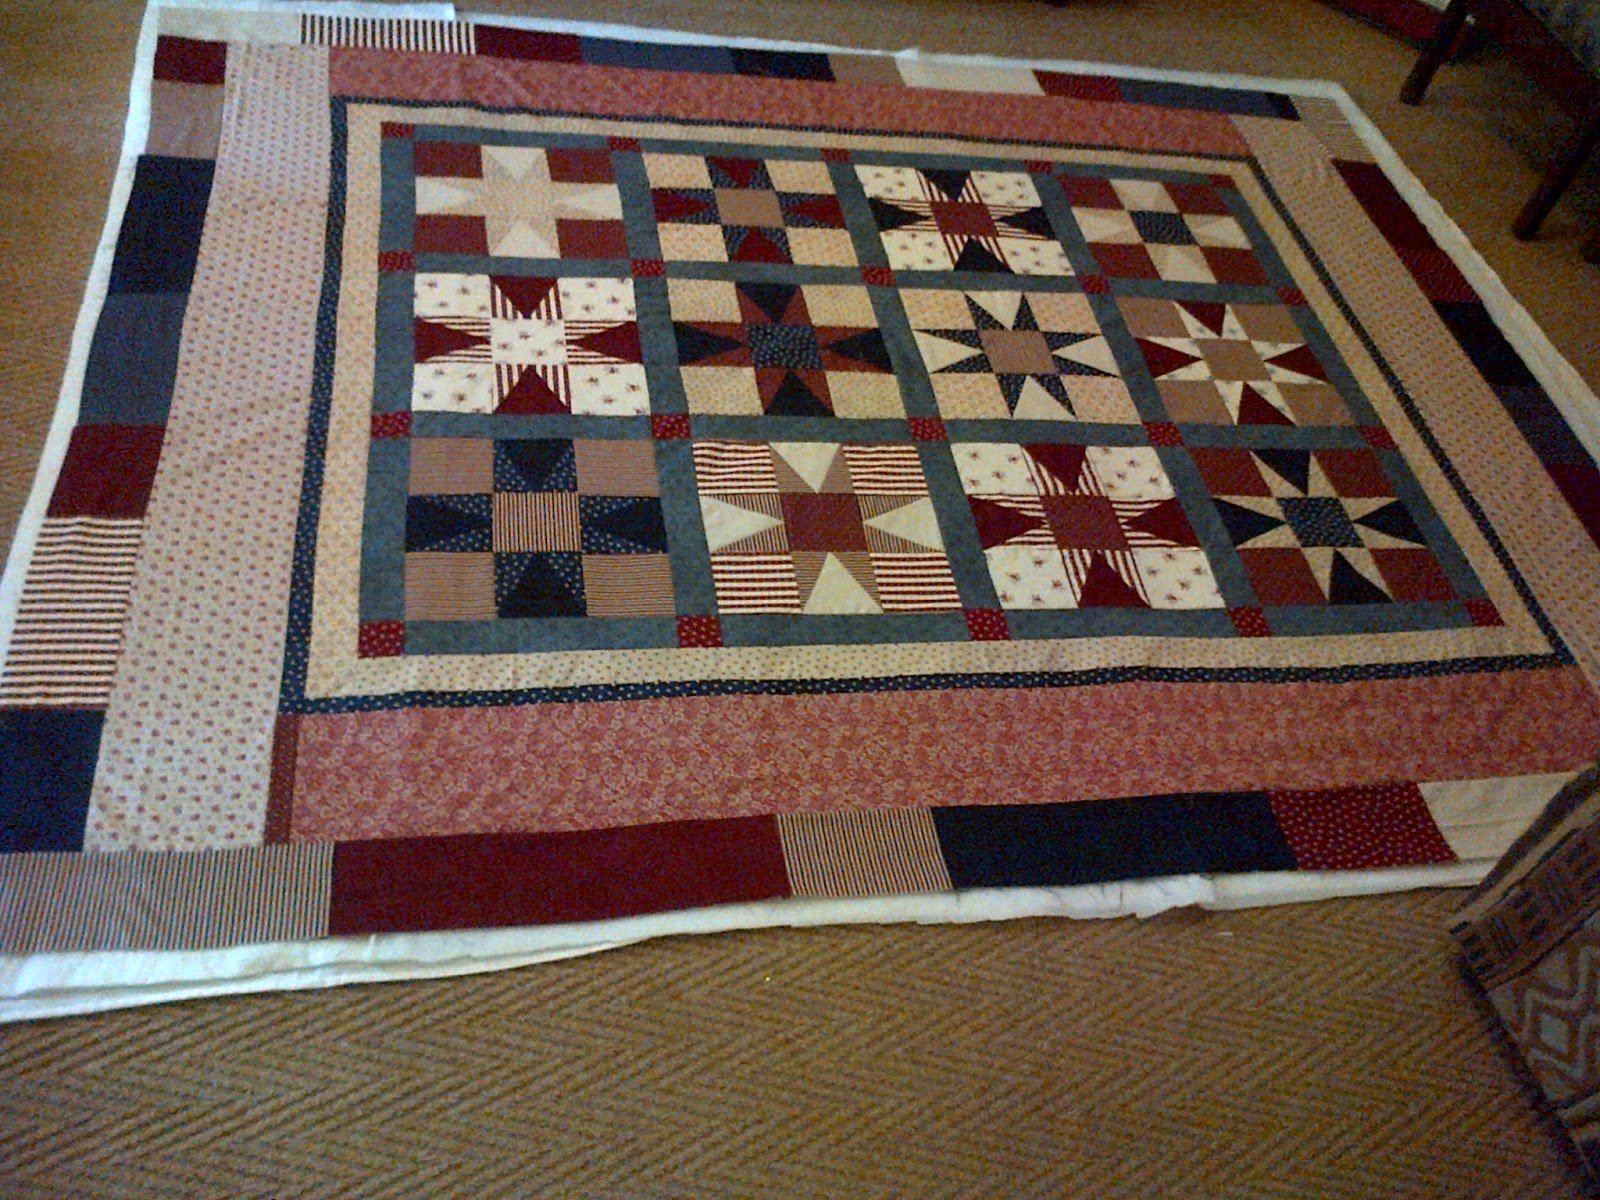
I have sandwiched my American Star quilt and am awaiting the cooler weather to start the hand stitching.
I have also started another bag - remember the one I mentioned earlier that I never had a pattern for? Well, I've decided to share the pattern with you all. So if you decide to give it a try, please share it with ME again. You are welcome to ask any questions.
Here goes :
1. Cut - 3 separate pieces - your outer layer, batting and lining -11" x 39". Forms a rectangle. Then  iron and sew any pictures of your choice on the outer layer (or you may leave it plain).


I'm busy appliquing some pics from Tiki Brophy's designs on mine in the same Vintage fabric that I used for my Star quilt and I added a small American flag in same fabric. See pic above.


2. We may as well complete all the major cutting out, so....Cut 3 pieces for top panel of bag - 4,5" x 22,5" each. See photo below.


Once the above steps have been completed, you are ready to move onto the next step.
Please give me a chance to catch up with my own work so that I have a written record of this bag pattern, before we move onto the next step. 
Happy stitching - until next time.........


3. The blanket stitching is now complete and we are ready to move onto the next step which is attaching that piece to a piece of batting  (similar size) underneath and tacking the 2 layers together so one can quilt through.


Below you will see that I have pinned the 2 layers together and will tack them and then complete the 'quilting' around each picture.


4. The quilting through the top and batting layers is now complete. I also added some wording to fill in the empty spaces.


5. I will now proceed to add whatever I need to the inner lining in the form of a pocket. I made a log cabin square which will be my pocket on the inside of the bag.


6. Once that is sewn in, you can then fold the lining over in half and stitch the sides together, leaving the top open. See pics below.


7. Then fold the quilted piece over in half and stitch the sides closed, also leaving the top open. 
Turn it inside out so that the right side is on the outside now.


........like this....


8. Then slip the lining inside the bag and smooth out all the folds and creases so that you have a flat surface. Corners into corners. Can you see my little pocket on the inside? Don't lose hope. You are almost finished! Remember that this is the lower part of your bag. You still have to tackle the top panel.


9.  Now the top panel of the bag.  Just to refresh your memory. This is what the completed bag will look like : (the lace is optional.)


10.  Remember you have 3 pieces for the top panel. So, fold each one over in half and stitch closed the side that is open. Turn the right way around,


11.  Stitch along the sides where I've placed the pins, so that they look like this :


12.  Once you have completed above, then turn right way round and slip the outer layer inside the lining -right sides together - and then the batting on the outside. It should look like this : it will be in this order..... batting,lining then fabric.

13.  Then stitch around the top through the 3 layers and .....

      
14.  ...........and turn the right way round.


15.  Pin and machine stitch through all 3 layers again to secure the top edge.


16.  Machine stitch through all 3 layers as close to the top of the edge as possible.


17.  Turn around to the right side.


18.  Then open up and separate the fabric and batting and keep them together and separate from the lining.


19.  Move it slowly over the top of the bag and secure with pins. Like this.......  You will need to gather the top of the bag because it's wider than the panel.

 20.  Machine stitch around that edge slowly catching all the layers as you move along. Remember there are gathers to catch as well. Work slowly.

21.  Lift the lining up and over the top edge and fold down to the inside of the bag and pin carefully so that the edge lines up with the bottom edge (there where i have the orange pin.) Fold in with a small seam and hand stitch with a slip stitch.


22.  Turn the whole bag right way round and attach any type of suitable handles. I chose these wooden ones.


The finished product!! I just love love  love it!!


Please feel free to ask any questions and share the bag that you've created, using my tutorial.
                                                       Much love..... Riekie x


Oh yes!! Almost forgot to tell you..... the baby quilt that I've been working on for the past few months for my dear friend Antonique's (baby 'Luron'), is finally complete. It's hanging up to dry and is absolutely gorgeous - if I must say so myself. Will post a pic of it tomorrow, once it's dry, my dears. Thanks for stopping by. May the Lord keep you until we meet again.


Sunday 17 February 2013

Mirror mirror on the wall.......


Hi folks!!!!! Long time no see...
MORE CRAFTS.........

Some time ago i designed some quilted bags which have hand stitching on them. I used designs from Tiki Brophy. They were a huge success and my stock is now depleted and have to make more. Unfortunately i had no pattern for the bags, so have to sit and scratch my head and think, think, scribble and think...... hence another bag is in the making. I will share the early stages with you...

                                                               These bags are soft, light and colourful. They are also ideal for knitting or sewing, even travelling - in which you can store magazines etc to keep yourself busy.

Thursday 14 February 2013


     For those of you who celebrated the day, i hope it was all you ever wanted it to be!

Sadly, My Valentine is out of the country but it was still a good day. The flowers and gifts were from my kids who will always try and turn a mundane day into something special. Thanks Freddy, Laura, Cheney and Rohan. They are sensitive enough to know that it is somewhat difficult when your man is far away and they always try make an effort to cheer me up.
Don't you just love the words in..."grow old with me..."? My hubby used them when he proposed to me so I thought they were quite appropriate today and reminded me of him.          
  Every day should be a day where we love tremendously, laugh loads and spread some joy and happiness to everybody whom we meet. Who knows what tomorrow may bring?

What is YOUR interpretation of 'love'?   Please feel free to leave a comment.


www.deeatthecarlton.blogspot.com   has a gorgeous Valentine's Day post today. Please drop in and visit her lovely Blog.                                          

Tuesday 12 February 2013

The vintage material I used in my quilt :  I must add that  was only going  to make one star block but after I saw the beautiful fabric that was available, I had to purchase more and then decided to make a quilt for our bed! I was reminded of our trip to the USA in 2008 and carry many beautiful memories. One thing that made a huge impression on me was how patriotric the Americans are! Almost every second home or public building has their flag flying. It saddened me to think that we - South Africans are not really like that! I admired so much about the USA! Eg : the fact that everything WORKS!!! You have access to sooooo much. Shops are open 24 hrs, reliable public transport, friendly and helpful people, massive buildings that are steeped in history. The Americans are so proud of their history and the preservation of everything attached to that! I could go on for ages but  today this post is about my American quilt. I want to remember our trip and give honour to all who fought in the 2nd World War.

Enough of our trip. I will post all about it at a later stage, but first.... my quilt...

Some of the fabric I used....

Dont you just love the variety of colour and designs? I've fallen in love with them.


 Sorting out my borders. I did not want to purchase any more for the borders and wanted to use up everything I had purchased. The red borders on the right and left hand side of the quilt do not belong to the vintage range, but sufficed because i needed long strips to complete the desired effect.
The quilt spread out on the floor, all 3 layers been measured up so that I can start sandwiching it. its almost complete. Will reveal in the next few posts. Be patient please because I'm not!

Why dont you tackle a 'vintage quilt' using some vintage fabrics? Pop into our Quiltalk shop or contact them if you live out of town. Email me if you require their telephone number. I believe they also have a lovely shop in George in the Cape.

Please tell me what you think about it and feel free to leave a comment. I always welcome positive criticism - where necessary. Thankyou for stopping by. I hope you are enjoying my blog as much as i am!                                                        happy quilting or crafting!


Have you guessed yet who those hands, in my previous blog, belong to?? Come on, just try... I will reveal soooon ....  You are going to love THAT post.       ta ta....
   

Monday 11 February 2013

           SHU!!!......
..... SO MUCH CATCHING UP TO DO......my cup overfloweth...

This blog is also about quilting, creativity etc, so i want to share a quilt with you, one that Im busy sandwiching at the moment. It's my vintage American quilt. I used a new range of vintage material that's been inspired by reproduction fabric from 2nd World War! supplied by our awesome quilt shop "Quiltalk". Check out their website "quiltalk.co.za" and if you are fortunate enough to live in our area _Klerksdorp - N.W.Province, then pay them a visit. You certainly won't be sorry! You are made to feel so welcome as you step into the shop and are overwhelmed by the huge choice of fabrics. Friendly owners and staff will embrace you.  

 Mark - (Sue's grandson) who gave up so much of his time to help mom and see to her while she was  struggling with her back and waiting for me to fetch her! Thanks again Mark!
The quilt that Sue purchased from me. I designed the donkey and cart especially for her because she has such a love and passion for them. Below - you can see a close up of the donkey and cart.
left - are the two pillow cases I made for Paul and Sue. They were meant for their antique chairs, but I later heard that they found their home on their bed! enjoy!